Blog (my web musings)
Find out what's interesting me, get tips, advice, and code gems that don't fit elsewhere.
Search Blog
Convert anchors to spans (LinkAdv / Atto fix in Moodle)
- Details
I've been working on a new Moodle installation recently for a school's learning zone, and while setting up courses, I've had chance to try out the default Atto text editor; a simple JavaScript editor built specifically for, and integrated with Moodle since version 2.7, after the phasing-out of TinyMCE 3.5. TinyMCE (version 4) still comes bundled with new Moodle installations, but it takes a back seat until an admin manually activates it in the backend.
Atto editor in Moodle
Atto editor offers basic WYSIWYG HTML editing, and although I'm more familiar and comfortable working with TinyMCE in other Content Management Systems, and favour it for its more advanced features, customisation, and extendability in my everyday projects, it has quickly become apparent to me how useful Atto is in the realm of Moodle.
Despite coming without a lot of the fluff that TinyMCE brings, it holds up pretty well as a simple WYSIWYG editor, and seems more than fit for purpose when formatting text, inserting the odd image and drawing a basic table. Let's not forget that Moodle is marketed as a learning platform (not a Content Management System per se), and as long as a course administrator can upload documents and structure lesson material easily, it doesn't really need to offer advanced layout options via its text editor.
Still, a very nice feature that Atto does boast, is a drag-and-drop upload facility for images; just drag your picture-of-choice into Atto's editing window, and it is automatically uploaded to the server, and inserted into your content, all in one move. This is mighty useful for a busy teacher who might want to bang in a diagram and type a description, without the hassle of working through multiple dialogue boxes to 1. upload, 2. browse to, and 3. insert an image.
Now to the main purpose of this article...
Atto and the illusive 'jump-to' target anchor
A feature that Atto lacks is the ability to easily create 'jump-to' anchors (where you target, or jump to, a specific section of a web page by hyperlinking to an element's id attribute value from a hashed href), via a button in its toolbar. If you want to give an element an id, you have to do it through HTML code view, and most teachers aren't going to want to do that! Somebody has thankfully created the LinkAdv plugin to extend Atto's link button, giving the option to add an id to an element (effectively creating a target anchor) via the 'Advanced' tab;
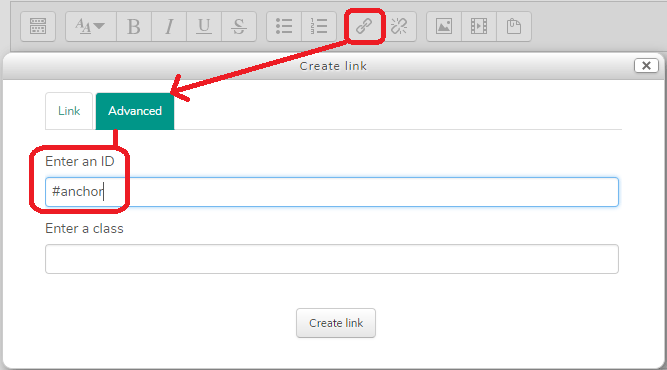
Unfortunately, on saving the entered id, if no URL is present in the 'Link' tab, Atto uses the value of the id you just entered to create a dummy hyperlink;
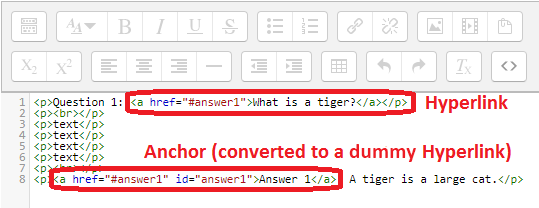
The problem with this is that the resulting anchors now take on the appearance of all other hyperlinks (they're given underlines and other CSS link styling, along with the pointy-hand cursor), leading to visitor confusion. More often, a visitor to a Moodle-powered system is a student, and take it from someone who's worked in and with schools for 10 years, students clicking on supposed-links that don't do anything, can be a great excuse for them not completing homework on time! Rather annoyingly, no amount of editing (via this plugin's dialogue window) will permanently delete this rogue URL.
JavaScript
Rather than go through the hassle of instructing teachers to use HTML view to edit their markup manually, I decided to do it on the client-side using JavaScript, through which I can compare the value of the href and the id, and then manipulate the markup when a match is found. Here's what I came up with;
function stripHrefFromAnchors(container) { // removes extra href inserted via LinkAdv plugin in Atto editor
    var anchors = document.querySelectorAll(container), anchor, span, hashValue, i;
    for (i=0; i<anchors.length; i++) {
        hashValue = anchors[i].hash.substring(1);
        anchor = anchors[i];
        if (hashValue && anchor.id === hashValue) { // if hash value exists and matches id
            span = document.createElement('span'); // convert a to span
            span.innerHTML = anchor.innerHTML;
            span.className = anchor.className;
            span.id = anchor.id;
            anchor.parentNode.replaceChild(span, anchor);
            }
        }
    }
stripHrefFromAnchors('#page-content a[href^="#"]'); // look inside the #page-content area for all links with an href starting with #
The script looks for all a elements that have an href starting with #, and compares it to the value of the id. If a match is found, it converts the a into a span, and strips out the href in the process.
In short, this; <a href="#answer1" id="answer1">Answer 1</a>
Becomes this; <span id="answer1">Answer 1</span>
You can add custom JavaScript to Moodle in the usual way; Just put it in <script> tags in the footer section of your Moodle installation via 'Site administration > Appearance > Additional HTML'. Depending on your theme, you may need to modify the #page-content a[href^="#"] selector in the function call on the last line (if your theme doesn't use a main #page-content container, for example).
Search Blog
Recent Posts
Popular Posts
Latest Scripts
- Scroll Down Before/ After Effect Image Switcher
- Pop-up Text Message with Entrance Effects
- Log and block email spam IPs w/ PHP + .htaccess
- Responsive CSS3 Blinds Effect Slideshow
- AJAX & PHP 5-Star Rating with Flat File Storage
- Defer YouTube Load until Scrolled-To (Lazy-Load)
- Keyboard Accessible 'Tab-to' Menu (JS)
- Defer Image Load until Scrolled-To (Lazy-Loading)
- Scroll Wide Tables w/ Gradient + Indicator (JS)
- Convert anchors to spans (LinkAdv/ Atto in Moodle)